Yokohama Village: Difference between revisions
Jump to navigation
Jump to search
| (2 intermediate revisions by the same user not shown) | |||
| Line 197: | Line 197: | ||
|<Public phone> | |<Public phone> | ||
|- | |- | ||
|[[File:Teacher Mori Icon.png]] | |[[File:Teacher Mori Search Icon.png]] | ||
|Teacher Mori | |Teacher Mori | ||
|<School teacher> | |<School teacher> | ||
|- | |- | ||
|[[File:Asanuma Icon.png]] | |[[File:Asanuma Search Icon.png]] | ||
|Asanuma | |Asanuma | ||
|<School teacher> | |<School teacher> | ||
|- | |- | ||
|[[File:Shiraki Icon.png]] | |[[File:Shiraki Search Icon.png]] | ||
|Shiraki | |Shiraki | ||
|<Hayase Harris' trainer> | |<Hayase Harris' trainer> | ||
Latest revision as of 09:56, 13 March 2023
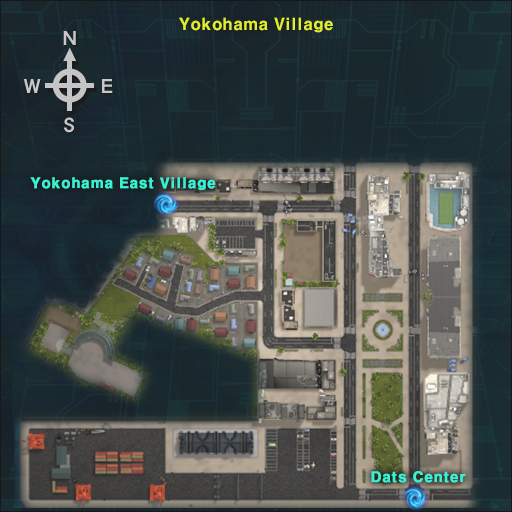
Due to the frequent appearance of Digimon, the DATS Center has classified this region as a specially monitored area.
Wild Digimon
| Digimon | HP | Levels | Type | Attribute | Behavior | Drops |
|---|---|---|---|---|---|---|
 |
330 | 1-2 | [[File:{{{type}}}.png|{{{type}}}: ]] {{{type}}} |  Vaccine Vaccine
|
[[File:{{{behavior}}}.png|{{{behavior}}}| ]] | 0 |
| Digimon | HP | Levels | Type | Attribute | Behavior | Drops |
|---|---|---|---|---|---|---|
 |
300 | 5-7 | [[File:{{{type}}}.png|{{{type}}}: ]] {{{type}}} |  None None
|
[[File:{{{behavior}}}.png|{{{behavior}}}| ]] | 0 |
| Digimon | HP | Levels | Type | Attribute | Behavior | Drops |
|---|---|---|---|---|---|---|
 |
450 | 9-11 | [[File:{{{type}}}.png|{{{type}}}: ]] {{{type}}} |  Data Data
|
[[File:{{{behavior}}}.png|{{{behavior}}}| ]] | 0 |
| Digimon | HP | Levels | Type | Attribute | Behavior | Drops |
|---|---|---|---|---|---|---|
 |
390 | 7-9 | [[File:{{{type}}}.png|{{{type}}}: ]] {{{type}}} |  Virus Virus
|
[[File:{{{behavior}}}.png|{{{behavior}}}| ]] | 0 |
| Digimon | HP | Levels | Type | Attribute | Behavior | Drops |
|---|---|---|---|---|---|---|
 |
880 | 15-16 | [[File:{{{type}}}.png|{{{type}}}: ]] {{{type}}} | Virus
|
[[File:{{{behavior}}}.png|{{{behavior}}}| ]] | 0 |
| Digimon | HP | Levels | Type | Attribute | Behavior | Drops |
|---|---|---|---|---|---|---|
 |
811 | 14-15 | [[File:{{{type}}}.png|{{{type}}}: ]] {{{type}}} | Data
|
[[File:{{{behavior}}}.png|{{{behavior}}}| ]] | 0 |
| Digimon | HP | Levels | Type | Attribute | Behavior | Drops |
|---|---|---|---|---|---|---|
 |
470 | 8-10 | [[File:{{{type}}}.png|{{{type}}}: ]] {{{type}}} | Data
|
[[File:{{{behavior}}}.png|{{{behavior}}}| ]] | 0 |
| Digimon | HP | Levels | Type | Attribute | Behavior | Drops |
|---|---|---|---|---|---|---|
| 550 | 11-13 | [[File:{{{type}}}.png|{{{type}}}: ]] {{{type}}} | Virus
|
[[File:{{{behavior}}}.png|{{{behavior}}}| ]] | 0 |
| Digimon | HP | Levels | Type | Attribute | Behavior | Drops |
|---|---|---|---|---|---|---|
 |
330 | 5-7 | [[File:{{{type}}}.png|{{{type}}}: ]] {{{type}}} | None
|
[[File:{{{behavior}}}.png|{{{behavior}}}| ]] | 0 |
| Digimon | HP | Levels | Type | Attribute | Behavior | Drops |
|---|---|---|---|---|---|---|
 |
290 | 5-7 | [[File:{{{type}}}.png|{{{type}}}: ]] {{{type}}} | None
|
[[File:{{{behavior}}}.png|{{{behavior}}}| ]] | 0 |
| Digimon | HP | Levels | Type | Attribute | Behavior | Drops |
|---|---|---|---|---|---|---|
 |
360 | 6-8 | [[File:{{{type}}}.png|{{{type}}}: ]] {{{type}}} | None
|
[[File:{{{behavior}}}.png|{{{behavior}}}| ]] | 0 |
| Digimon | HP | Levels | Type | Attribute | Behavior | Drops |
|---|---|---|---|---|---|---|
 |
770 | 13-15 | [[File:{{{type}}}.png|{{{type}}}: ]] {{{type}}} | Data
|
[[File:{{{behavior}}}.png|{{{behavior}}}| ]] | 0 |
| Digimon | HP | Levels | Type | Attribute | Behavior | Drops |
|---|---|---|---|---|---|---|
 |
360 | 7-9 | [[File:{{{type}}}.png|{{{type}}}: ]] {{{type}}} |  Unknown Unknown
|
[[File:{{{behavior}}}.png|{{{behavior}}}| ]] | 0 |
| Digimon | HP | Levels | Type | Attribute | Behavior | Drops |
|---|---|---|---|---|---|---|
 |
830 | 14-16 | [[File:{{{type}}}.png|{{{type}}}: ]] {{{type}}} | Unknown
|
[[File:{{{behavior}}}.png|{{{behavior}}}| ]] | 0 |
NPC's

|
Yoshino Fujieda | <DATS member> |

|
Kristy Damon | <Marcus Damon's brother> |

|
Sarah Damon | <Marcus Damon's mother> |

|
Sora's Mom | <Clothes shop> |

|
Megumi Shirakawa | <Riding Agent> |

|
Miki Kurosaki | <DATS member> |

|
Inoue Mama | <Item seller> |

|
Michelle Krier | <Keenan Krier's mother> |

|
Takashi | <Male student> |

|
Conner Shiratori | <Mooncakes shop owner> |

|
Inoue Papa | <Devoted husband> |

|
Vending Machine | <Vending machine> |

|
Phonebooth | <Public phone> |
|
|
Phonebooth | <Public phone> |

|
Teacher Mori | <School teacher> |

|
Asanuma | <School teacher> |

|
Shiraki | <Hayase Harris' trainer> |
|
|
Vending Machine | <Vending machine> |
|
|
Phonebooth | <Public phone> |

|
Vivi | <Street cat> |

|
Homer Yushima | <Unidentified old man> |

|
Carry | <Disk seller> |

|
Akihiro Kurata | <Doctor> |

|
Doruphin | <Equipment Merge> |

|
PawnChessmon B | <DATS member> |

|
PawnChessmon W | <DATS member> |

|
DigimonArchive | <DATS> |

|
Incubator | <Hatch Digimon> |
Loading Screen
-
 New Yokohama Village

