
Rainbow Bridge: Difference between revisions
From Digital Masters World
More actions
Revision as of 05:45, 9 March 2026 by imported>SJ XIII (→Part 1 Raid)
El3mentary (talk | contribs) No edit summary |
No edit summary |
||
| Line 4: | Line 4: | ||
</imagemap></div> | </imagemap></div> | ||
To enter this dungeon, it is required to have 1 [[File:Ikkakumon's Help.png]] '''Ikkakumon's Help'''. | |||
The item is given by NPC in [[Minato City]]. | |||
=Part 1= | =Part 1= | ||
==Wild Digimon== | ==Wild Digimon== | ||
{{ | {{Wild | ||
|name=Betamon | |name=Betamon | ||
|levels= | |behavior=Aggressive | ||
| | |levels= | ||
| | |attr=Water | ||
|type=Virus | |||
|hp=? | |hp=? | ||
}} | }} | ||
== | ==Raid== | ||
{{ | {{Wild | ||
|name=Gesomon | |name=Gesomon | ||
|levels= | |behavior=Aggressive | ||
| | |levels=120 | ||
| | |attr=Water | ||
|hp=8 | |type=Virus | ||
| | |hp=8.985.000 | ||
|drop1=Four Holy Beast Dungeon Box | |||
}} | }} | ||
=Part 2= | =Part 2= | ||
==Wild Digimon== | ==Wild Digimon== | ||
{{ | {{Wild | ||
|name=Gizamon | |name=Gizamon | ||
|levels= | |behavior=Aggressive | ||
| | |levels= | ||
| | |attr=Water | ||
|type=Virus | |||
|hp=? | |hp=? | ||
}} | |||
}}{{ | {{Wild | ||
|name=Seadramon | |name=Seadramon | ||
|levels= | |behavior=Aggressive | ||
| | |levels= | ||
| | |attr=Water | ||
|hp= | |type=Data | ||
|hp= | |||
}} | }} | ||
== | ==Raid== | ||
{{ | {{Wild | ||
|name=Shellmon | |name=Shellmon | ||
|levels= | |behavior=Aggressive | ||
| | |levels= | ||
| | |attr=Water | ||
|hp=9 | |type=Data | ||
| | |hp=9.150.000 | ||
|drop1=Four Holy Beast Dungeon Box | |||
}} | }} | ||
{{ | {{Wild | ||
|name=MegaSeadramon | |name=MegaSeadramon | ||
|levels= | |behavior=Aggressive | ||
| | |levels= | ||
| | |attr=Water | ||
|hp=1 | |type=Data | ||
|hp=1.121.400 | |||
}} | }} | ||
=Part 3= | =Part 3= | ||
==Wild Digimon == | ==Wild Digimon == | ||
{{ | {{Wild | ||
|name=Seadramon | |name=Seadramon | ||
|levels= | |behavior=Aggressive | ||
| | |levels= | ||
| | |attr=Water | ||
|hp= | |type=Data | ||
|hp=? | |||
}} | }} | ||
== | ==Raid== | ||
{{ | {{Wild | ||
|name=MegaSeadramon | |name=MegaSeadramon | ||
|levels= | |behavior=Aggressive | ||
| | |levels= | ||
| | |attr=Water | ||
|hp=26 | |type=Data | ||
| | |hp=26.166.000 | ||
|drop1=Four Holy Beast Dungeon Box | |||
}} | }} | ||
=Drops= | |||
= Drops = | [[File:Four Holy Beast Dungeon Box.png]] Rainbow Bridge Reward Box [Gesomon] Drop List | ||
{| | {| | ||
|2x|| [[File:Monster_Card_Lv3.png]] || High Rank Monster Card Lv3 | |2x||[[File:Monster_Card_Lv3.png|link=Monster Card]]||[[High Rank Monster Card Lv3]] | ||
|- | |- | ||
|3x|| [[File:Digiclon Box.png]] || Digiclone [A-S] | |3x||[[File:Digiclon Box.png|link=Digiclone]]||Digiclone [A-S] | ||
|- | |- | ||
||| [[File:Attribute Epic.png]] || [DS] Attribute Rank B Lv4 | ||1x||[[File:Attribute Epic.png|link=Equipment attributes]]||[DS] Attribute Rank B Lv4 | ||
|- | |- | ||
||| [[File:Attribute Epic.png]] || [HP] Attribute Rank B Lv4 | |1x||[[File:Attribute Epic.png|link=Equipment attributes]]||[HP] Attribute Rank B Lv4 | ||
|- | |- | ||
||| [[File:Chipset Box.png]] || Chipset Box [HP] R10 | |1x||[[File:Chipset Box.png|link=ChipSets]]||Chipset Box [HP] R10 | ||
|- | |- | ||
||| [[File:Powder of Evolution.png]] || Powder of Evolution | |?x||[[File:Powder of Evolution.png]]||[[Nanomon (Item Craft)|Powder of Evolution]] <span style="color:red">Character Bound</span> | ||
|- | |- | ||
||| [[File:Aquatic DigiEgg Level 3.png]] || Syakomon DigiEgg | |1x||[[File:Aquatic DigiEgg Level 3.png]]||Syakomon DigiEgg | ||
|} | |} | ||
</div> | </div> | ||
[[File:Four Holy Beast Dungeon Box.png]] Rainbow Bridge Reward Box [Shellmon] Drop List | |||
{| | {| | ||
|2x|| [[File:Monster_Card_Lv3.png]] || High Rank Monster Card Lv3 | ||2x||[[File:Monster_Card_Lv3.png|link=Monster Card]]||[[High Rank Monster Card Lv3]] | ||
|- | |- | ||
|3x|| [[File:Digiclon Box.png]] || Digiclone [A-S] | |3x||[[File:Digiclon Box.png|link=Digiclone]]||Digiclone [A-S] | ||
|- | |- | ||
||| [[File:Attribute Epic.png]] || [DS] Attribute Rank B Lv4 | ||1x||[[File:Attribute Epic.png|link=Equipment attributes]]||[DS] Attribute Rank B Lv4 | ||
|- | |- | ||
||| [[File:Attribute Epic.png]] || [HP] Attribute Rank B Lv4 | |1x||[[File:Attribute Epic.png|link=Equipment attributes]]||[HP] Attribute Rank B Lv4 | ||
|- | |- | ||
||| [[File:Chipset Box.png]] || Chipset Box [HP] R10 | |1x||[[File:Chipset Box.png|link=ChipSets]]||Chipset Box [HP] R10 | ||
|- | |- | ||
||| [[File:Powder of Evolution.png]] || Powder of Evolution | |?x||[[File:Powder of Evolution.png]]||[[Nanomon (Item Craft)|Powder of Evolution]] <span style="color:red">Character Bound</span> | ||
|- | |- | ||
||| [[File:Seal Icon.png]] || Shellmon Seal (DE +150) | |?x||[[File:Seal Icon.png|link=Seal Master]]||[[Seal Master|Shellmon Seal (DE +150)]] | ||
|} | |} | ||
</div> | </div> | ||
[[File:Four Holy Beast Dungeon Box.png]] Enraged Sea Dragon's Reward Box Drop List | |||
{| | {| | ||
|2x|| [[File:Monster_Card_Lv3.png]] || High Rank Monster Card Lv3 | ||2x||[[File:Monster_Card_Lv3.png|link=Monster Card]]||[[High Rank Monster Card Lv3]] | ||
|- | |- | ||
|2x|| [[File: | |2x||[[File:Random Mid Class Transcendence ConvertChip Box.png]]||Random Mid Class Transcendence ConvertChip Box | ||
|- | |- | ||
|3x||[[File:DigiSoul Food HP A.png]] || DigiSoul Food HP: A (HP +5000) | |3x||[[File:DigiSoul Food HP A.png]]||DigiSoul Food HP: A (HP +5000) | ||
|- | |- | ||
|3x||[[File:DigiSoul Food DS A.png]] || DigiSoul Food DS: A (DS +5000) | |3x||[[File:DigiSoul Food DS A.png]]||DigiSoul Food DS: A (DS +5000) | ||
|- | |- | ||
|3x||[[File:DigiSoul Food ALL A.png]] || DigiSoul Food ALL: A (HP +3000 / DS +3000) | |3x||[[File:DigiSoul Food ALL A.png]]||DigiSoul Food ALL: A (HP +3000 / DS +3000) | ||
|- | |- | ||
|3x||[[File:Grace of Challenge AT +50%.png]] || Grace of Challenge [AT] +50% (2 Hours) | |3x||[[File:Grace of Challenge AT +50%.png]]||Grace of Challenge [AT] +50% (2 Hours) | ||
|- | |- | ||
|3x||[[File:Grace of Challenge HP Max +50%.png]] || Grace of Challenge [HP Max] +50% (2 Hours) | |3x||[[File:Grace of Challenge HP Max +50%.png]]||Grace of Challenge [HP Max] +50% (2 Hours) | ||
|- | |- | ||
|3x||[[File:Grace of Challenge DS Max +50%.png]] || Grace of Challenge [DS Max] +50% (2 Hours) | |3x||[[File:Grace of Challenge DS Max +50%.png]]||Grace of Challenge [DS Max] +50% (2 Hours) | ||
|- | |- | ||
|3x||[[File:Grace of Challenge DE +50%.png]] || Grace of Challenge [DE] +50% (2 Hours) | |3x||[[File:Grace of Challenge DE +50%.png]]||Grace of Challenge [DE] +50% (2 Hours) | ||
|- | |- | ||
|3x||[[File:Grace of Challenge EXP +1000%.png]] || Grace of Challenge [EXP] +1000% (2 Hours) | |3x||[[File:Grace of Challenge EXP +1000%.png]]||Grace of Challenge [EXP] +1000% (2 Hours) | ||
|- | |- | ||
|3x||[[File:Grace of Challenge Skill Damage +100%.png]] || Grace of Challenge [Skill Damage] +100% (1 Minute) | |3x||[[File:Grace of Challenge Skill Damage +100%.png]]||Grace of Challenge [Skill Damage] +100% (1 Minute) | ||
|- | |- | ||
|3x||[[File:Grace of Challenge Critical Damage +100%.png]] || Grace of Challenge [Critical Damage] +100% (1 Minute) | |3x||[[File:Grace of Challenge Critical Damage +100%.png]]||Grace of Challenge [Critical Damage] +100% (1 Minute) | ||
|- | |- | ||
|2x||[[File:Grace of Challenge MS +35%.png]] || Grace of Challenge [MS] +35% (1 Minute) | |2x||[[File:Grace of Challenge MS +35%.png]]||Grace of Challenge [MS] +35% (1 Minute) | ||
|- | |- | ||
||| [[File:Chipset Box.png]] || Chipset Box [HP] R11 | |1x||[[File:Chipset Box.png|link=ChipSets]]||Chipset Box [HP] R11 | ||
|- | |- | ||
||| [[File:Chipset Box.png]] || Chipset Box [DS] R11 | |1x||[[File:Chipset Box.png|link=ChipSets]]||Chipset Box [DS] R11 | ||
|- | |- | ||
||| [[File:Chipset Box.png]] || Chipset Box [AT] R11 | |1x||[[File:Chipset Box.png|link=ChipSets]]||Chipset Box [AT] R11 | ||
|- | |- | ||
||| [[File:Chipset Box.png]] || Chipset Box [DE] R11 | |1x||[[File:Chipset Box.png|link=ChipSets]]||Chipset Box [DE] R11 | ||
|- | |- | ||
||| [[File:Chipset Box.png]] || Chipset Box [HT] R11 | |1x||[[File:Chipset Box.png|link=ChipSets]]||Chipset Box [HT] R11 | ||
|- | |- | ||
||| [[File:Attribute Unique.png]] || [HP] Attribute Rank B LvMax | |1x||[[File:Attribute Unique.png|link=Equipment attributes]]||[HP] Attribute Rank B LvMax | ||
|- | |- | ||
||| [[File:Attribute Unique.png]] || [DS] Attribute Rank B LvMax | |1x||[[File:Attribute Unique.png|link=Equipment attributes]]||[DS] Attribute Rank B LvMax | ||
|- | |- | ||
||| [[File:Attribute Unique.png]] || [AT] Attribute Rank B LvMax | |1x||[[File:Attribute Unique.png|link=Equipment attributes]]||[AT] Attribute Rank B LvMax | ||
|- | |- | ||
||| [[File:Attribute Unique.png]] || [DE] Attribute Rank B LvMax | |1x||[[File:Attribute Unique.png|link=Equipment attributes]]||[DE] Attribute Rank B LvMax | ||
|- | |- | ||
||| [[File:Absolute Essence of Evolution.png]] || Absolute Essence of Evolution | |?x||[[File:Absolute Essence of Evolution.png]]||[[Nanomon (Item Craft)|Absolute Essence of Evolution]] <span style="color:red">Character Bound</span> | ||
|} | |} | ||
</div> | </div> | ||
==Note== | |||
- Good placev for level up digimon from 1 untill 120 but you need have good [[Clothing|accessory]], [[Seal Master|seals]] and clone your partner. | |||
- Use full set of [[Clothing|Futuristic Battle cloth]], EXP Booster, [[Clothing|Newbie's Yellow Soccer Uniform]] for maximize your EXP. | |||
=Loading Screen= | =Loading Screen= | ||
Revision as of 07:45, 28 November 2023
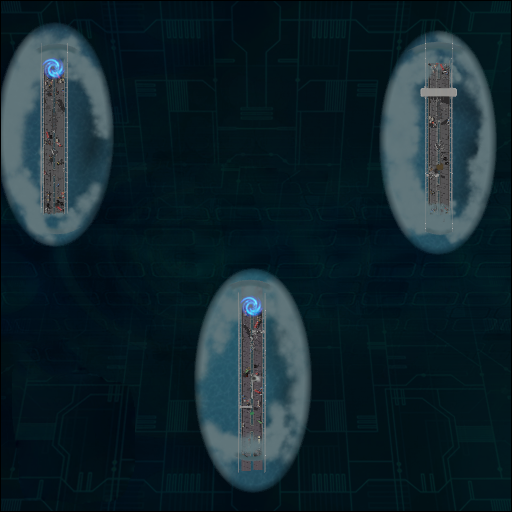
To enter this dungeon, it is required to have 1  Ikkakumon's Help.
The item is given by NPC in Minato City.
Part 1
Wild Digimon
| Digimon | HP | Levels | Type | Attribute | Behavior | Drops |
|---|---|---|---|---|---|---|
 |
? |  Virus |
 Water |

|
0 |
Raid
| Digimon | HP | Levels | Type | Attribute | Behavior | Drops |
|---|---|---|---|---|---|---|
 |
8.985.000 | 120 | Virus
|
Water
|
|

|
Part 2
Wild Digimon
| Digimon | HP | Levels | Type | Attribute | Behavior | Drops |
|---|---|---|---|---|---|---|
 |
? | Virus
|
Water
|
|
0 |
| Digimon | HP | Levels | Type | Attribute | Behavior | Drops |
|---|---|---|---|---|---|---|
 |
 Data |
Water
|
|
0 |
Raid
| Digimon | HP | Levels | Type | Attribute | Behavior | Drops |
|---|---|---|---|---|---|---|
 |
9.150.000 | Data
|
Water
|
|
|
| Digimon | HP | Levels | Type | Attribute | Behavior | Drops |
|---|---|---|---|---|---|---|
 |
1.121.400 | Data
|
Water
|
|
0 |
Part 3
Wild Digimon
| Digimon | HP | Levels | Type | Attribute | Behavior | Drops |
|---|---|---|---|---|---|---|
|
? | Data
|
Water
|
|
0 |
Raid
| Digimon | HP | Levels | Type | Attribute | Behavior | Drops |
|---|---|---|---|---|---|---|
|
26.166.000 | Data
|
Water
|
|
|
Drops
 Rainbow Bridge Reward Box [Gesomon] Drop List
| 2x |  |
High Rank Monster Card Lv3 |
| 3x |  |
Digiclone [A-S] |
| 1x |  |
[DS] Attribute Rank B Lv4 |
| 1x | |
[HP] Attribute Rank B Lv4 |
| 1x |  |
Chipset Box [HP] R10 |
| ?x |  |
Powder of Evolution Character Bound |
| 1x |  |
Syakomon DigiEgg |
Rainbow Bridge Reward Box [Shellmon] Drop List
| 2x | |
High Rank Monster Card Lv3 |
| 3x | |
Digiclone [A-S] |
| 1x | |
[DS] Attribute Rank B Lv4 |
| 1x | |
[HP] Attribute Rank B Lv4 |
| 1x | |
Chipset Box [HP] R10 |
| ?x | |
Powder of Evolution Character Bound |
| ?x |  |
Shellmon Seal (DE +150) |
Enraged Sea Dragon's Reward Box Drop List
| 2x | |
High Rank Monster Card Lv3 |
| 2x | File:Random Mid Class Transcendence ConvertChip Box.png | Random Mid Class Transcendence ConvertChip Box |
| 3x |  |
DigiSoul Food HP: A (HP +5000) |
| 3x |  |
DigiSoul Food DS: A (DS +5000) |
| 3x |  |
DigiSoul Food ALL: A (HP +3000 / DS +3000) |
| 3x |  |
Grace of Challenge [AT] +50% (2 Hours) |
| 3x |  |
Grace of Challenge [HP Max] +50% (2 Hours) |
| 3x |  |
Grace of Challenge [DS Max] +50% (2 Hours) |
| 3x |  |
Grace of Challenge [DE] +50% (2 Hours) |
| 3x |  |
Grace of Challenge [EXP] +1000% (2 Hours) |
| 3x |  |
Grace of Challenge [Skill Damage] +100% (1 Minute) |
| 3x |  |
Grace of Challenge [Critical Damage] +100% (1 Minute) |
| 2x |  |
Grace of Challenge [MS] +35% (1 Minute) |
| 1x | |
Chipset Box [HP] R11 |
| 1x | |
Chipset Box [DS] R11 |
| 1x | |
Chipset Box [AT] R11 |
| 1x | |
Chipset Box [DE] R11 |
| 1x | |
Chipset Box [HT] R11 |
| 1x |  |
[HP] Attribute Rank B LvMax |
| 1x | |
[DS] Attribute Rank B LvMax |
| 1x | |
[AT] Attribute Rank B LvMax |
| 1x | |
[DE] Attribute Rank B LvMax |
| ?x |  |
Absolute Essence of Evolution Character Bound |
Note
- Good placev for level up digimon from 1 untill 120 but you need have good accessory, seals and clone your partner.
- Use full set of Futuristic Battle cloth, EXP Booster, Newbie's Yellow Soccer Uniform for maximize your EXP.

